
Stu Davies revives a 1989 2hp outboard engine

Although new 2-stroke engines are no longer available for recreational boating, they remain popular on the second-hand market. In fact, they sell now for more than they cost when new because they’re light, robust and easy to maintain and repair. It’s important to carry out a 2-stroke outboard service for several reasons.
Number one on a 2-stroke is that the spark plug can get dirty – the oil for the engine is actually in the fuel and it can be a dirty mix, oiling up the spark plug over time. The oil in the gearbox needs changing every couple of years too, or checked every year and then changed if necessary.
The seals do go, and water can get into the oil so we need to deal with that. And, of course today’s E10 petrol absorbs water and when the alcohol evaporates it leaves the water behind, which then reacts with the metals in the carburettor, forming gunge and plugging the jets up.

The 2-stroke outboard is a very simple, lightweight engine
It gets very oily inside the float chamber where the old petrol has evaporated. Even the 4-strokes don’t get on with the alcohol in the petrol. They have minuscule pilot jets in them and run a lot leaner to comply with emissions regulations.
On 2-strokes, the jet is much bigger and doesn’t block as easily. These 2-strokes are simple, very light, but a bit dirty in the exhaust. Note the serial number because there are myriad sources online which tell you where and what year the motor was made.
My old engine doesn’t have a kill cord switch, but you can retrofit one. Engine dealers can provide the part and I’ll add the cord fitting to make it safe.
Simple 2-stroke outboard service
The good news is, servicing an outboard is easy enough, as long as you’re happy wielding a 10mm spanner. I did this recently with my 1989 2-stroke Mercury 2.2 – a pre-electronic ignition engine, which has sat in my garage for three years.
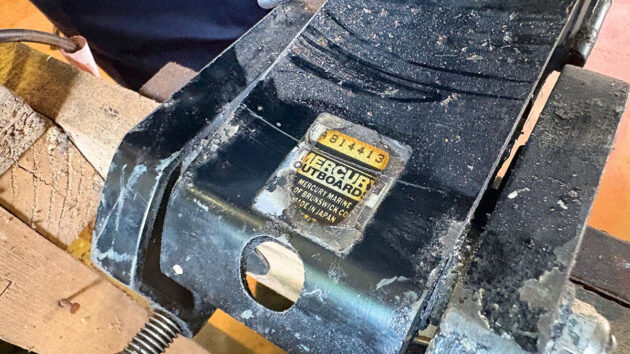
The serial number will tell you where and when your engine was made
You need simple hand tools: screwdrivers, combination wrenches and a three-drive socket set or a set of suitably sized spanners, which you can buy from Machine Mart.
A three-legged puller is ideal for removing the flywheel to get at the points. I also have a set of wire brushes for taking the old corroded paint off the engine, then primer and new paint to finish the job. A battery drill is handy too.
Then it’s simply a case of taking out the plug, loosening the two screws at the bottom in the gearbox, and removing the carburettor. Change the oil, clean the carburettor, check the spark plug, grease the impeller, change the gearbox oil and you’re ready to go.
Step-by-step guide

1. Loosen the petrol cap and undo all the necessary screws so you can remove the engine cowling.

2. Pull off the plug cap then remove the spark plug with a plug socket. Clean the spark plug with a wire brush.

3. Take the cover off the flywheel or ‘magneto’. Inside this pre-electronic engine, there’s a set of points.

4. Take the petrol pipe off and then the carburettor. Be sure to keep the screws in a tray so as not to lose them.

5. Inspect the carburettor’s float bowl and clean out any gunge that’s built up in there.

6. Check the main jet is not blocked. Note, there’s a needle that goes in and out with the throttle control.

7. Take out the float valve by removing the pin, give the whole carburettor a spray with brake and clutch cleaner, including the bowl, then reassemble.

8. On the drive leg, remove the propeller and impeller cover. Using needle nose pliers, gently tease off the raw water impeller.

9. Check the impeller for damage and grease with silicone before reassembling. Don’t forget to replace the split pin.

10. Check the gearbox oil is clean. If it’s milky, it means there’s sea water going along the shaft into the gearbox, and you need to change the seal and the oil.

11. Replace the gearbox oil (typically a job every couple of years) with oil having a rating such as API GL5.

12. Mix 50-parts petrol with 1-part oil and fill the tank. With a little choke and a little throttle, your freshly serviced motor will hopefully fire into life first time.
Watch the full 2-stroke outboard service below:
- Thanks to Machine Mart for providing tools.

Your guide to the outboard engine: troubleshooting common problems
Whether it be a small outboard engine to drive our dinghy or a bigger one to drive our fast ‘toys’,…
How to service your outboard steering
After a midnight steering failure, one boat owner learns a hard lesson about the "fiddly" but essential maintenance of remote…

How to service an outboard engine: step by step
Stu Davies shares useful maintenance tips on how to keep your 2-stroke and 4-stroke outboard motors running sweetly
Backflushing an outboard motor: step-by-step
You’ve replaced your impeller, but the engine’s still not pumping cooling water as it should. Jake Frith recommends chemical backflushing…

What to read more practical articles like 2-stroke outboard service in 12 steps?
A subscription to Practical Boat Owner magazine costs around 40% less than the cover price.
Print and digital editions are available through Magazines Direct – where you can also find the latest deals.
PBO is packed with information to help you get the most from boat ownership – whether sail or power.
-
-
-
- Take your DIY skills to the next level with trusted advice on boat maintenance and repairs
- Impartial, in-depth gear reviews
- Practical cruising tips for making the most of your time afloat
-
-
Follow us on Facebook, Instagram, TikTok and X