
How to do some basic checks of your inflatable lifejacket, checking the lifejacket for damage, airtightness and the inflation mechanism

It’s recommended that you take your lifejackets for a full service every year, but for many boat owners this job is near the bottom of the ‘to-do’ list and often forgotten.
Richard Palin and Andy Scott from International Safety Products (ISP), one of the largest manufacturers of lifejackets in the world and based in Merseyside, dropped by PBO’s offices in Poole to show us how you can carry out your own checks to make sure your lifejacket will be there for you when you need it.
It’s not a service in the full sense of the word, but would be better described as interim checking.
Only a service station will be able to fully service a lifejacket and carry out all the necessary testing, but following this guide should help you keep your lifejackets in tip-top condition.
STEP 1: Check the condition
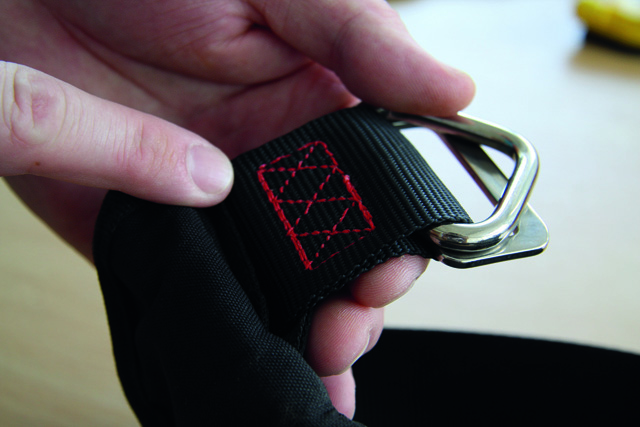
Check for chafe, especially where webbing passes through buckles
The first thing to do is to check the condition of the exterior of the lifejacket. Is all the stitching intact? This especially applies to the harness D-ring. Also check for chafe of tapes around buckles, pulling the webbing through to check all friction points.
Now open up the jacket, checking that the securing Velcro or zip is still sewn on all the way round the jacket. Before you disturb the bladder inside, it’s a good idea to take a photograph so you know exactly how it all folds back again. Now unpack the bladder, lie it flat and inspect it for wear, damage, chafe and discolouration.
We looked at two which had been sitting in a damp locker all season and looked perfectly OK from the outside. As soon as we opened them up, however, we were greeted with a mass of rust and discoloured material. The cylinders had rusted through and were empty. We forced one of them out and tried a new cylinder in the jacket – but rust particles had become trapped in the mechanism and destroyed the air-tight seal. On the other jacket the firing pin had also rusted through.
‘These are condemned, without a doubt,’ said ISP’s project engineer Richard Palin. We inflated one of the lifejackets using a new cylinder – and it deflated within half an hour.

If your lifejacket looks like this, it should be condemned!
Inflate the lifejacket, either by using your old cylinder or by oral inflation (modern materials mean there’s no danger of the insides of the bladder sticking together with moisture from your breath).
Don’t use compressed air from an air line to inflate as the valves are very sensitive.
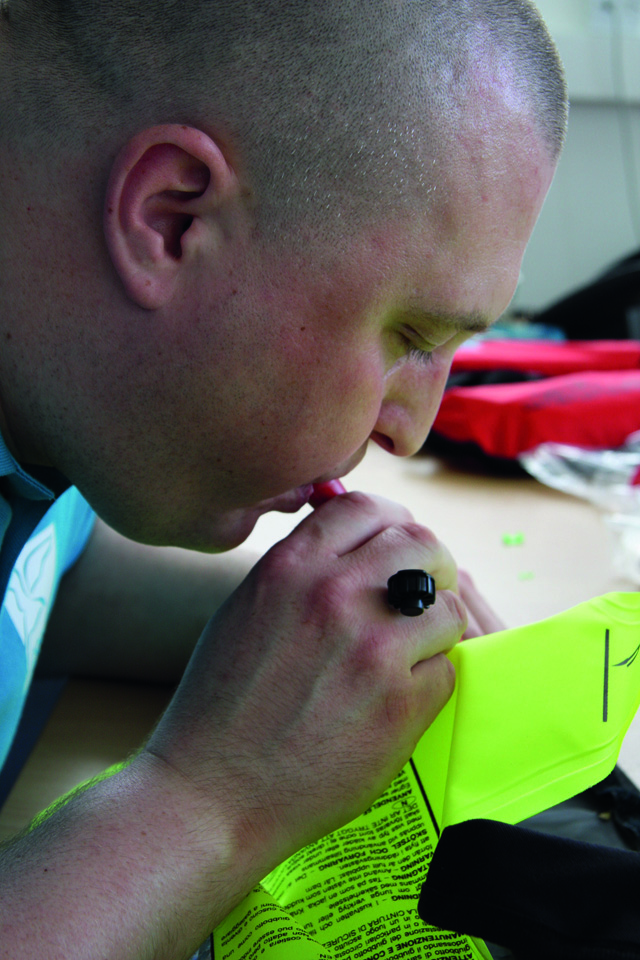
Inflate the jacket to check for air- tightness, and leave for 12-16 hours
Inflate as much as you can orally, and leave the jacket with the oral tube dust cap off for a minimum of 12-16 hours. If it deflates at all, contact the retailer or take it to a service station.
Leaks are most likely from the oral inflation valve or from the firing mechanism.

Deflate the bladder by depressing the valve with the reverse of the cap
Providing there is no leak, deflate by inverting the oral tube dust cap in the end of the tube to open the valve, expel all the air from the bladder, then replace the dust cap correctly.
Finally wash the jacket in fresh water, using a mild washing up liquid solution if necessary, then rinse it off thoroughly. Leave to dry away from direct sunlight or heat. You should disable an automatic inflator mechanism before washing and cleaning, but it’s important to remember to re-arm the lifejacket once it has dried off.
Step 2: Check the firing mechanism

Remove the cylinder, check the movement of the firing pin and that the ripcord is not frayed
Next, check that the ripcord on the firing mechanism is not frayed. Remove the cylinder and green retaining clip and check the movement of the firing pin. It shouldn’t protrude when the firing lever is in the closed position – check this by carefully putting your finger in the hole.
Check that the cylinder is free from rust and that the burst cap (the membrane which is pierced by the firing pin) is intact. If there’s any corrosion on the cylinder or damage to the burst cap, you should replace it.

Weigh the cylinder and check that its burst cap is intact
You should also replace the cylinder if it is underweight. Cylinders have no ‘use-by’ date – instead the filled bottle weight is stamped on the side. While your home scales won’t be as precise as a professional’s, you’ll be able to see if the bottle is significantly underweight. If it’s considerably lighter than it should be, take it to a chandlery for disposal – or better still, use it to test-inflate your lifejacket.
To replace the bottle, screw it in firmly, but don’t use undue force.
Automatic firing mechanisms
If you have an automatic jacket, you need to check the automatic firing mechanism. There are three main types – Halkey Roberts (HR), United Mouldings (UML) and Hammar.
If you have a HR or UML one, unscrew the automatic cap and check the dates.
A HR-type has an unscrewable end-cap with a disolvable bobbin inside. The bobbin should be replaced every two years, or according to the manufacturer’s instructions.
UML automatic caps are self-contained. If the spring and cap are loose, it has deployed and needs replacement. The dates stamped on UML units are replacement dates, but you should change the automatic cap at least every two years anyway.
Hammar units are self-contained, with the cylinder stored inside the bladder. Check the replacement date and that the indicator window is showing green – if it’s red, replace it. A tool will come with the rearming kit to release the mechanism.
All types have some sort of colour indicator – if any red is visible while assembled, again, replace it.

A UML automatic cap. A green cap denotes an unused trigger unit

Halkey Roberts mechanisms consist of a cap and a bobbin

Hammar units are sealed, with the cylinder inside the bladder
STEP 3: Other checks to make

You can now move on to the light, checking that it works. Automatic lights usually have an ‘off’ and an ‘auto’ setting. There may also be a test setting. If not, set it to auto and put a paperclip across the contacts.
Check the manufacturing date and expiry date of the light, as well as the next service date, which should all be stamped on the light body.
Now check the whistle is securely attached and is in working order.
A sprayhood is an important part of any jacket so you should check it for damage, and make sure that it’s properly attached. When you re-fold it, make sure it’s concertinaed on top of the bladder, and not inside – it may stop the jacket inflating if it’s in the wrong place.
STEP 4: Re-pack the lifejacket

Flake-fold the bladder, starting at the cylinder side of the jacket
Finally, you can repack the lifejacket. If in doubt, consult the photos you took earlier.
The basic rule is never to roll the bladder – always flake-fold or concertina it, as if you were flaking a mainsail.
Start folding from the cylinder side (so you can let any stray air out of the oral inflation tube on the other side). Fold in either side of the cylinder. You should be able to see the green safety clip when you just open the cover and peek inside. Make sure the pull-cord is protruding outside of the cover – it may be a nuisance but it’s no use inside.
Move on to the other side of the jacket and concertina it, followed by the collar. Fold in any hard or sharp points to avoid chafe. If there’s still some air trapped inside the bladder, expel it via the oral tube. Now go around the jacket making sure the Velcro is closed, running your finger around to make sure it’s all lined up.

Carefully fold the bladder at the collar, avoiding any ‘hard’ points

Close up the jacket’s Velcro or zip, making sure the ripcord is outside

Your lifejacket should now work when you really need it