
Tim Marsden demonstrates how he fashioned a smart pair of cockpit locker lids for his bargain boat using glassfibre and iroko hardwood

Having avidly followed the restoration of the PBO Project Boat Hantu Biru over the past few years, like many readers I was inspired to have a go myself.
However, after studying the classifieds in PBO and making countless calls around boatyards, it was starting to look a bit hopeless. Then one Friday afternoon I was paging through the boat section on eBay when I came across a sad little 18-footer languishing in an abandoned storage locker. With only 1 hour 20 minutes left on the auction, I bid the contents of my ‘boat savings fund jar’ and went to pick the kids up from school. You can imagine my surprise to discover, on my return from the school run, that I was now a boat owner!
The following weekend we travelled down to Birmingham – not generally known as a centre for sailing – to pick up our boat, a Foxcub 18. The newly-rechristened Water Pig (never let children choose names for siblings, pets and especially boats!) was loaded onto a trailer and brought back to Cheshire – also not generally known as a centre for sailing.
The boat had been abandoned halfway through a restoration, so most of the fittings had been stripped and the hatches were missing. Having only spent £265 on my new toy it seemed ridiculous to spend thousands fitting her out, so we decided that the whole project should
be completed in the same vein – as cheaply as possible.
We worked all summer, sanding, scraping and painting, until the weather eventually turned against us. She would have to be made watertight, so I needed to learn a new skill – carrying out a glassfibre lay-up.
I have always admired the look of gently weathered teak on the topsides of a boat. Therefore, it was decided to remake the two cockpit lockers, cabin hatch and chain locker with a glassfibre base and a teak strip inlaid top.
I had some glassfibre practice when strengthening the cockpit sole and bulkheads, and this, together with encouraging articles in PBO on using epoxy and laying teak decking, convinced me that even with my limited skills I’d be able to make considerable progress throughout the dark winter evenings.
Making a plug and a mould1:

1: Glassfibre can either be laid up directly into a female mould, or a mould can be made from a male plug. I needed to produce two locker lids, and because wooden moulds can sometimes be damaged when removing components, I decided to make a glassfibre mould from a male wooden plug. The plug is an exact representation of the finished locker lid. Don’t waste time and money on exotic wood or complicated joints: my plug is reclaimed timber, butt-jointed and glued.

2: It’s also sometimes easier to make a male plug: the large outer radius of the hatch lid is simply planed down with progressively smaller flats, then finished with sandpaper in the palm of your hand – no fancy routing or joints. You can add details to the mould such as this latch surround.
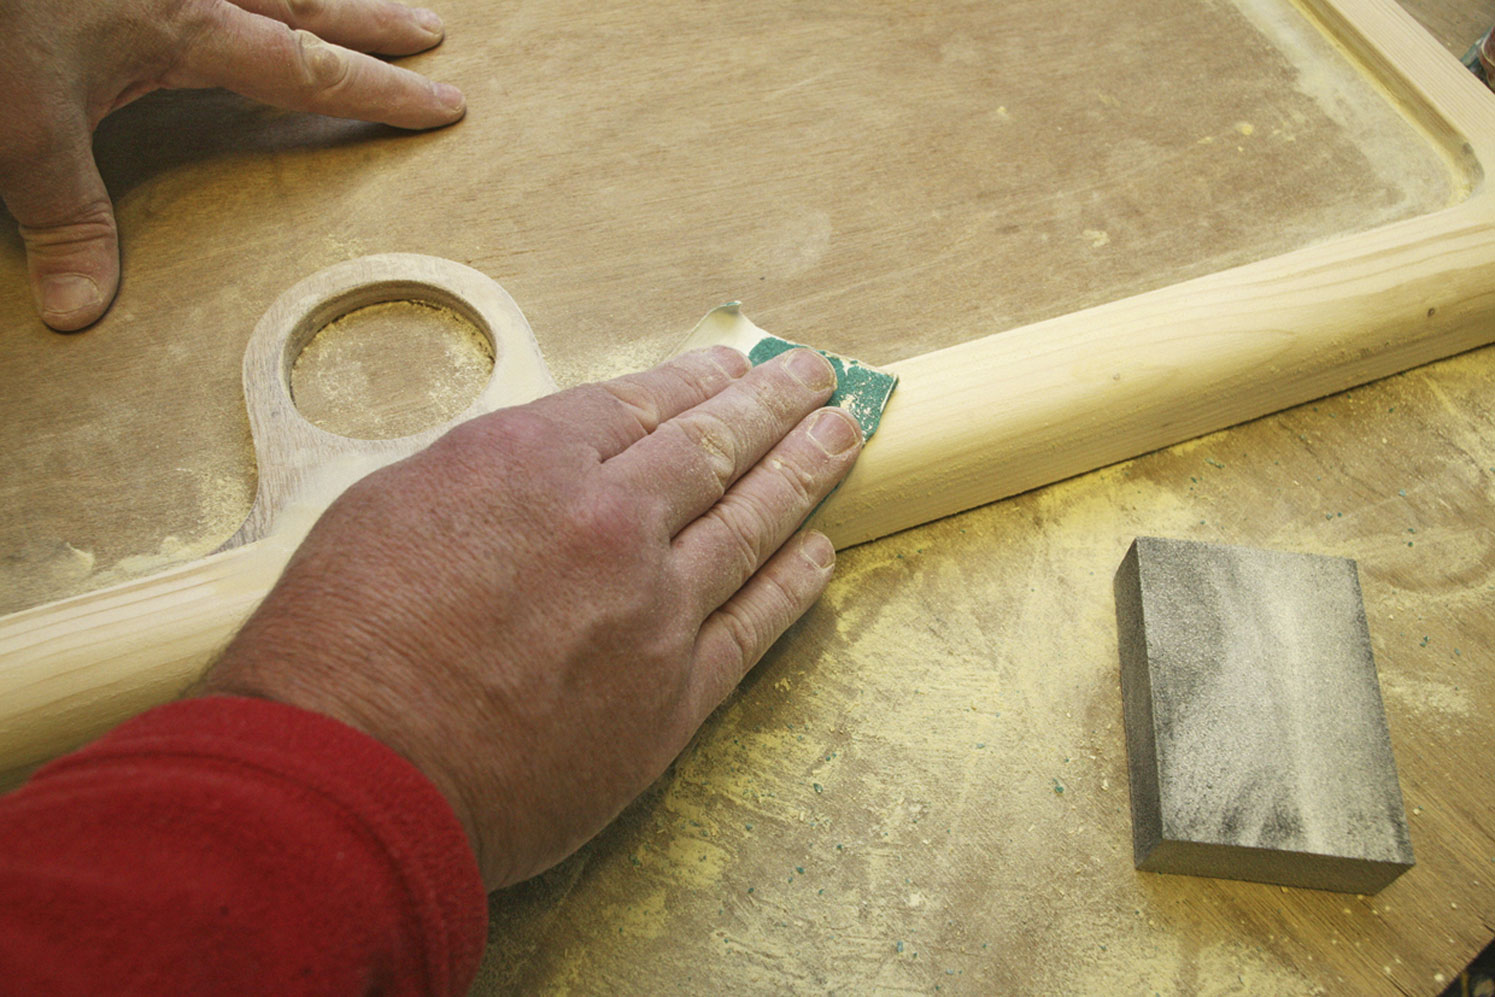
3: Spend time on the surface finish: fill and sand repeatedly until you achieve the best finish possible. Work progressively through the grades of sandpaper, finishing off with a 400-grit paper.
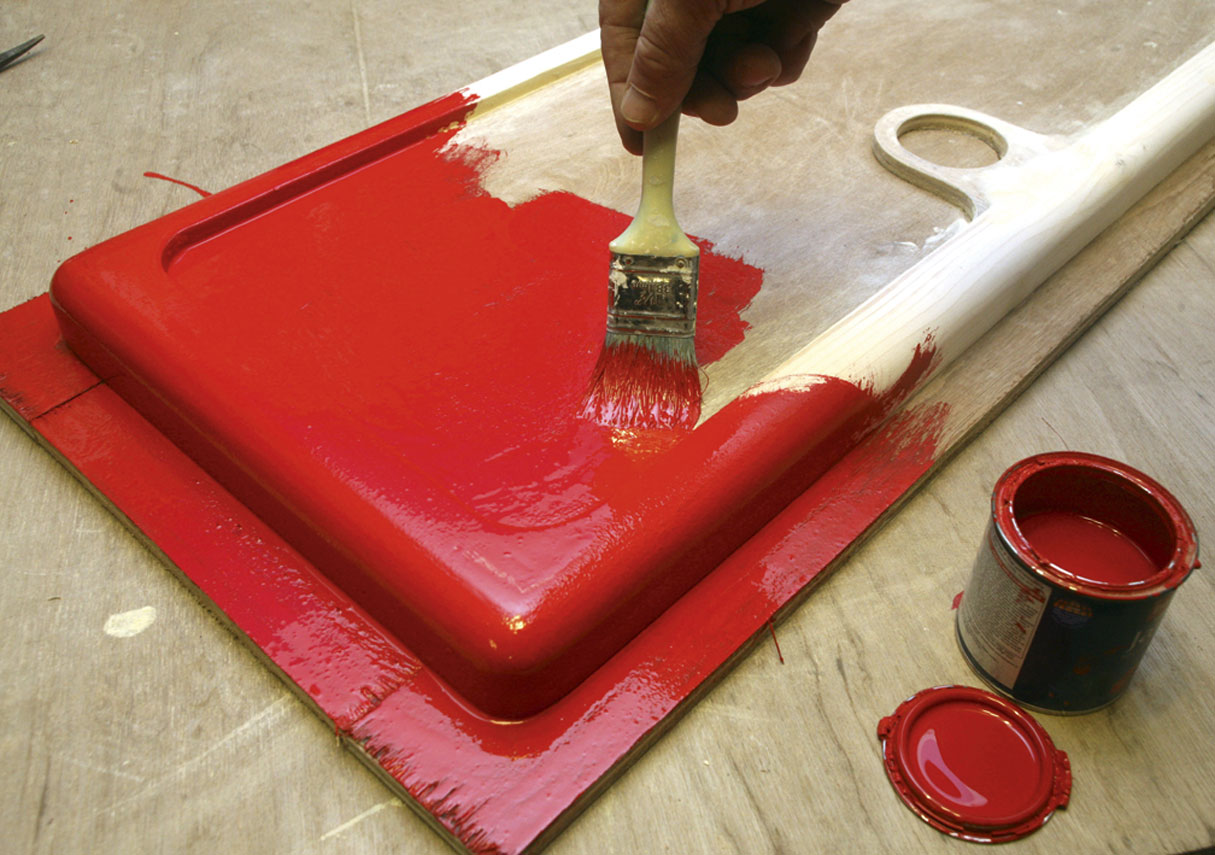
4: Give the mould several good, thick coats of a darker-coloured paint, preferably gloss black (though I only had red), which will show up any imperfections. Flatten the surface after each coat of paint. For radiuses and corners I find a sponge sanding block finishes the job nicely.
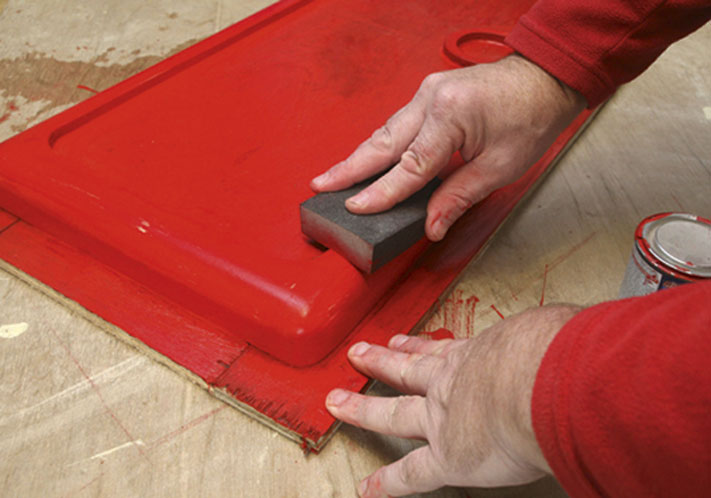
5: I only flattened the areas that can be seen after the wooden inlay has been applied: my thinking being that a slightly rougher surface would yield a better key for adhesive or bedding compounds. Before lay-up begins you will need to ensure that the plug can be removed when the mould is cured. I used a good quality wax paste, painted onto the mould and polished to a gloss finish. At least three coats should be applied.

6: Have all the gelcoat, resins, pigments and catalyst accurately weighed out and the glass strand mat cut into the right sizes for the job – and keep all pots, mixing spatulas, brushes and rollers to hand. Don’t mix too much resin at one time; only about as much as you can use in 10 minutes. Read the instructions on resin-to-catalyst ratios and the optimum room temperatures to work in. The gelcoat should be a thick custard-like resin.
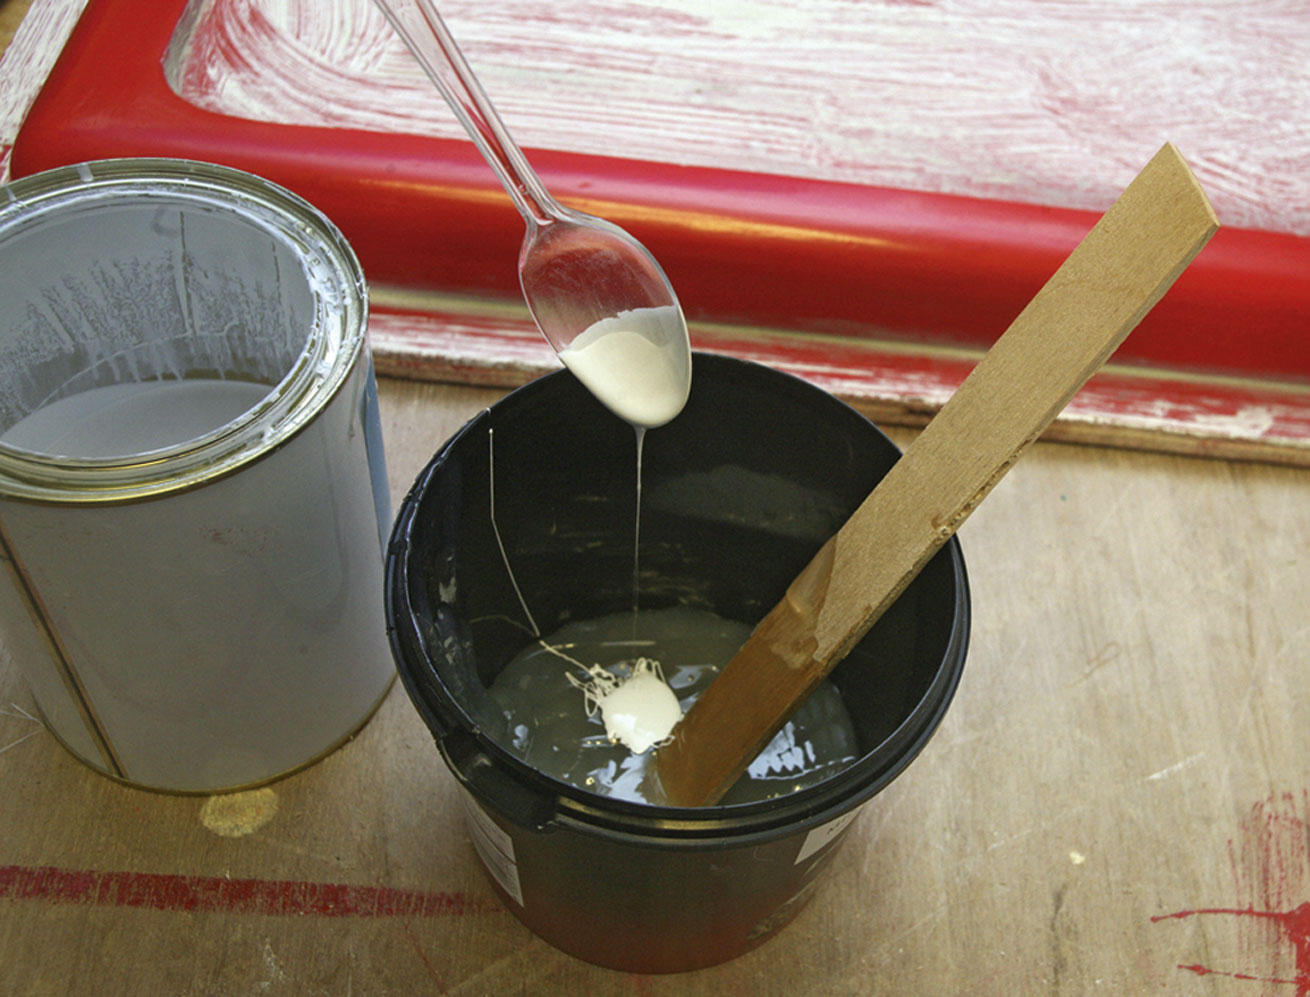
7: Pigments (which seem to be proportionally very expensive) can be added to the gel to give it colour. Again, weigh out the pigment or you will end up with several shades of white on different components.
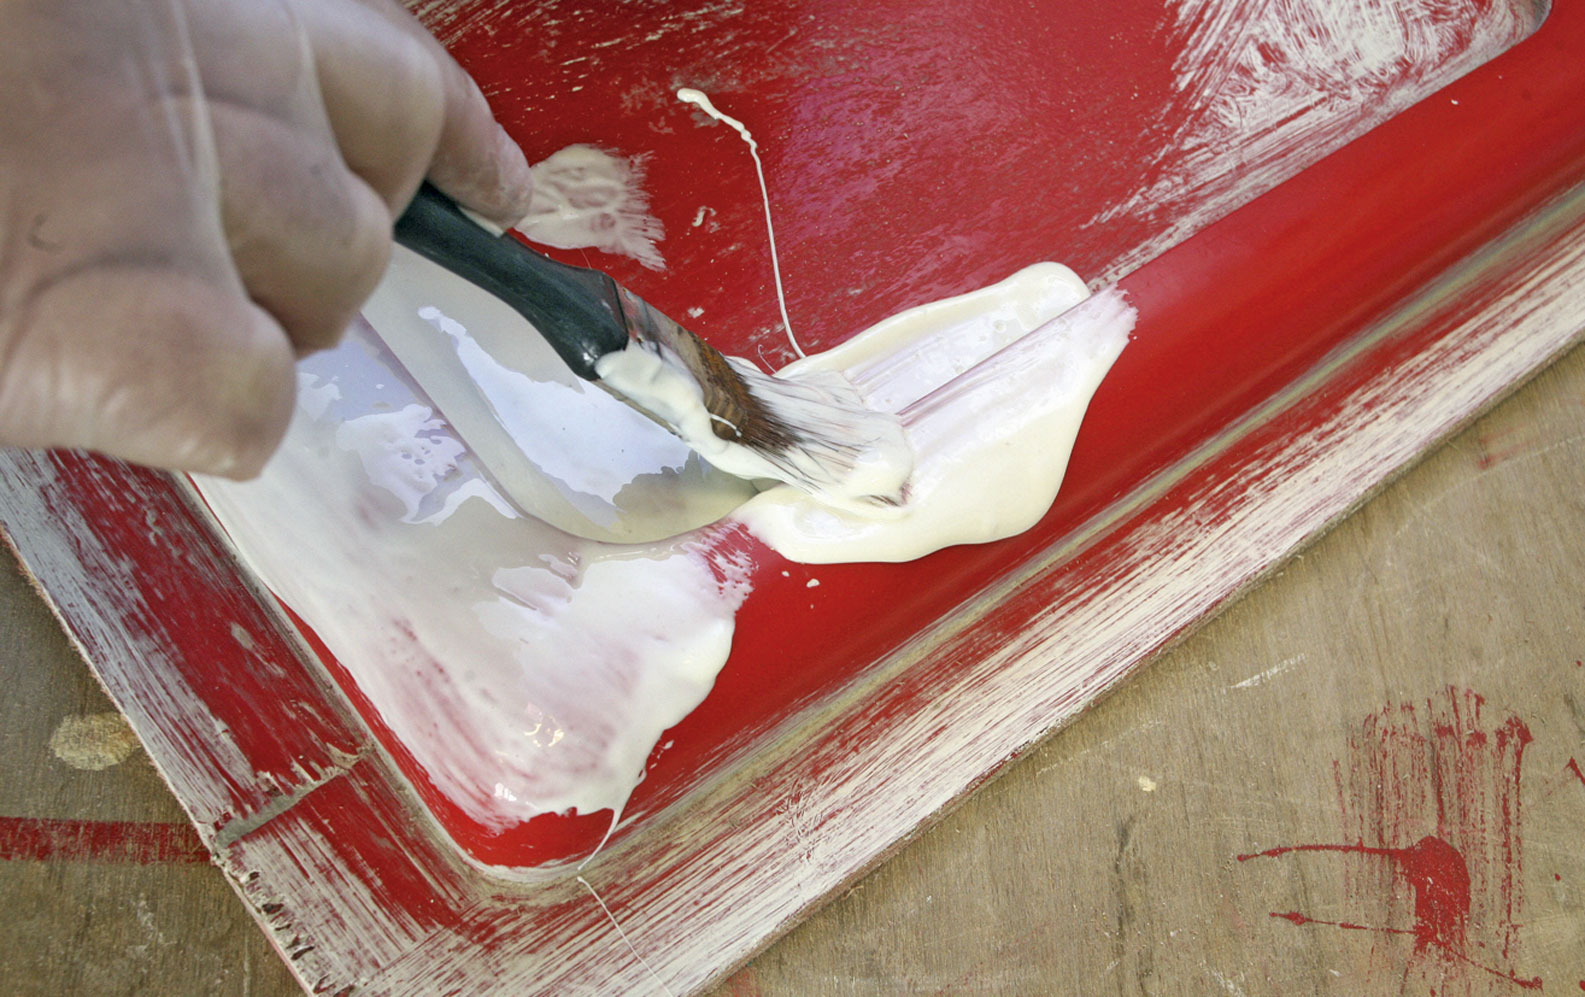
8: Gelcoat should ideally be sprayed onto a plug or mould, but with a little care a perfectly acceptable finish can be achieved by carefully brushing the gel. Use long, light strokes to build up a thickness of about 0.5 to 0.7mm. Invariably the corners end up a bit thicker, but don’t skimp or you may end up with translucent spots.

9: The main body of the hatch cover is laid up with 300g strand mat. If this is laid directly onto the gelcoat the coarse strands may show through onto the finished surface, so on surfaces that can be seen on the finished hatch, a layer of 150g tissue is first laid over the gelcoat to protect the surface finish.

10: Once the tissue lay-up has cured, any sharp edges or corners must be filled with strips of cut strands of 300g mat: this will stop voids under the gelcoat which would otherwise eventually break through, revealing the glass matting.

11: Brush a layer of resin over the gelcoat and lay the glass mat onto the plug. Load a cheap paintbrush with resin and stipple onto the glass mat, thoroughly wetting the mat out and pushing resin into the strands. Try not to ‘brush’ the resin as it will distort the mat and create lumps. Only use enough resin to wet the mat: too much will make the mould brittle when cured. A roller will help remove excess resin and air bubbles.

12: If you are making a mould, depending on the size, two layers of glassfibre should be sufficient. Slide a wooden wedge between the plug and the mould. Work your way around the edge, carefully knocking the wedges further under the flange. Because the glassfibre shrinks slightly when cured, it will be quite tight, but if you have used enough releasing wax the mould will eventually ‘pop’ off the plug.
Making the hatches

1: You now have a female glassfibre mould, ready to make multiple identical hatch covers. Clean the mould and reapply several coats of releasing wax and you are ready to lay up your first moulding.

2: You can trim the excess from the moulding with an angle grinder. To ensure the base of the moulding was flat, I mounted the grinder in a simple home-made jig at a height of 35mm from a baseboard.

3: The two hatch covers I made for Water Pig had five layers of 300g mat. On reflection this may have been slight overkill because I also strengthened the inside of the moulding with battens, which were glassed into place to stiffen things up. I didn’t want the fixings for the hinges to show on the top of the hatch, so I glued and glassed small plates of stainless steel into place where I could drill and tap a 6mm thread to take the machine screws.

4: To make the lockers watertight I wanted a flat base to the hatch cover. A sheet of glassfibre was laid up, glued to the underside and trimmed to size: this will allow the hatch to seal on a rubber extrusion fixed around the hatch opening.
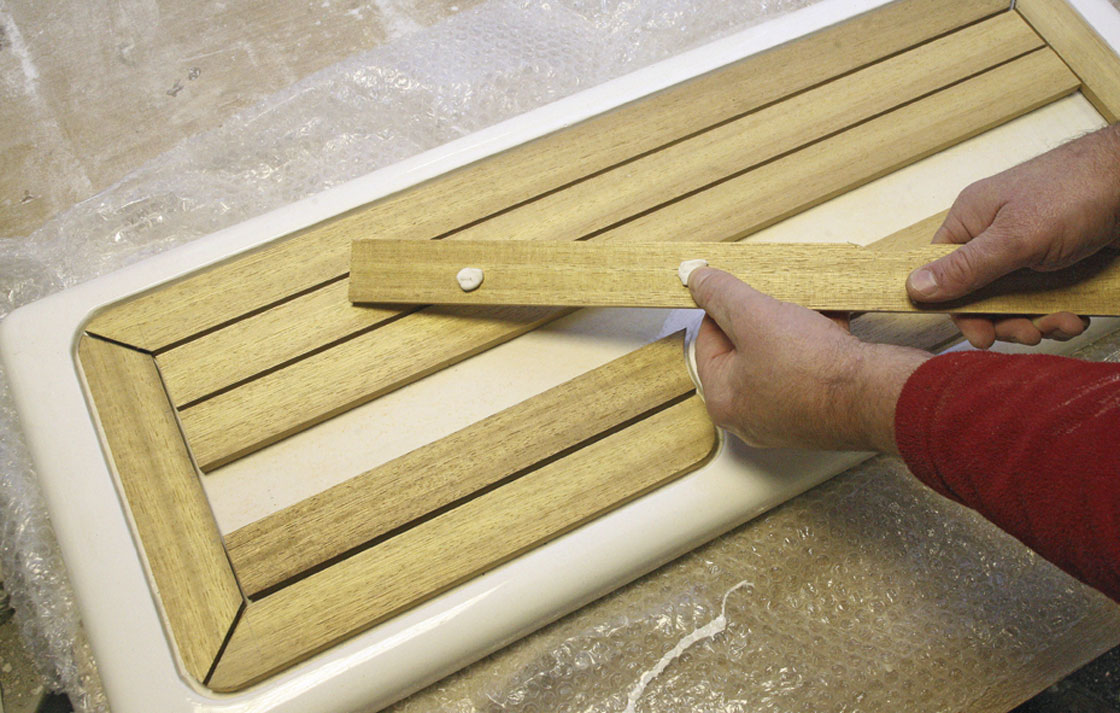
5: A wooden infill would finish the hatches off nicely: but I hadn’t bargained on how difficult it would be to find the right wood. I eventually found a supplier who was willing to quarter-cut a section of iroko: this would give me vertical grain in the planks to avoid warping and movement in the finished hatch surface. Cut and fit the edge strips first, holding them in place with Blu Tack until you are pleased with the position and overall look, then number the pieces and prepare the iroko for gluing.
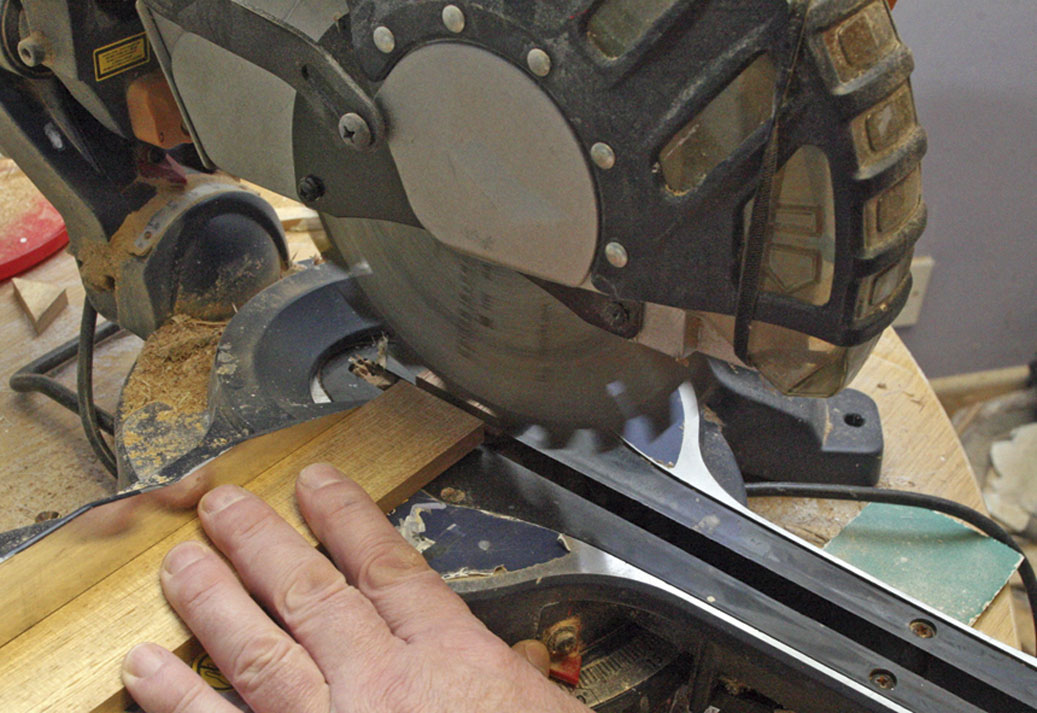
6: Care was taken when cutting the iroko strips. Keeping all the lines parallel and the corners square will give the finished hatch cover a professional look. I used a selection of tools including a chop saw capable of producing accurate angles for the edges. I also used a Dremel-type grinder to shape the radius around the latch moulding.

7: Iroko and teak are very oily woods and require the glued surface to be cleaned with an acetone-type solvent before it can be bonded. A combined bedding compound and glue is no doubt ideal for the job, but if you
are only laying a small area it can get very expensive. I used good old Sikaflex 295i, which seems to stick to just about anything. Position the wood with a good bead of adhesive and hold it down with weights if necessary.
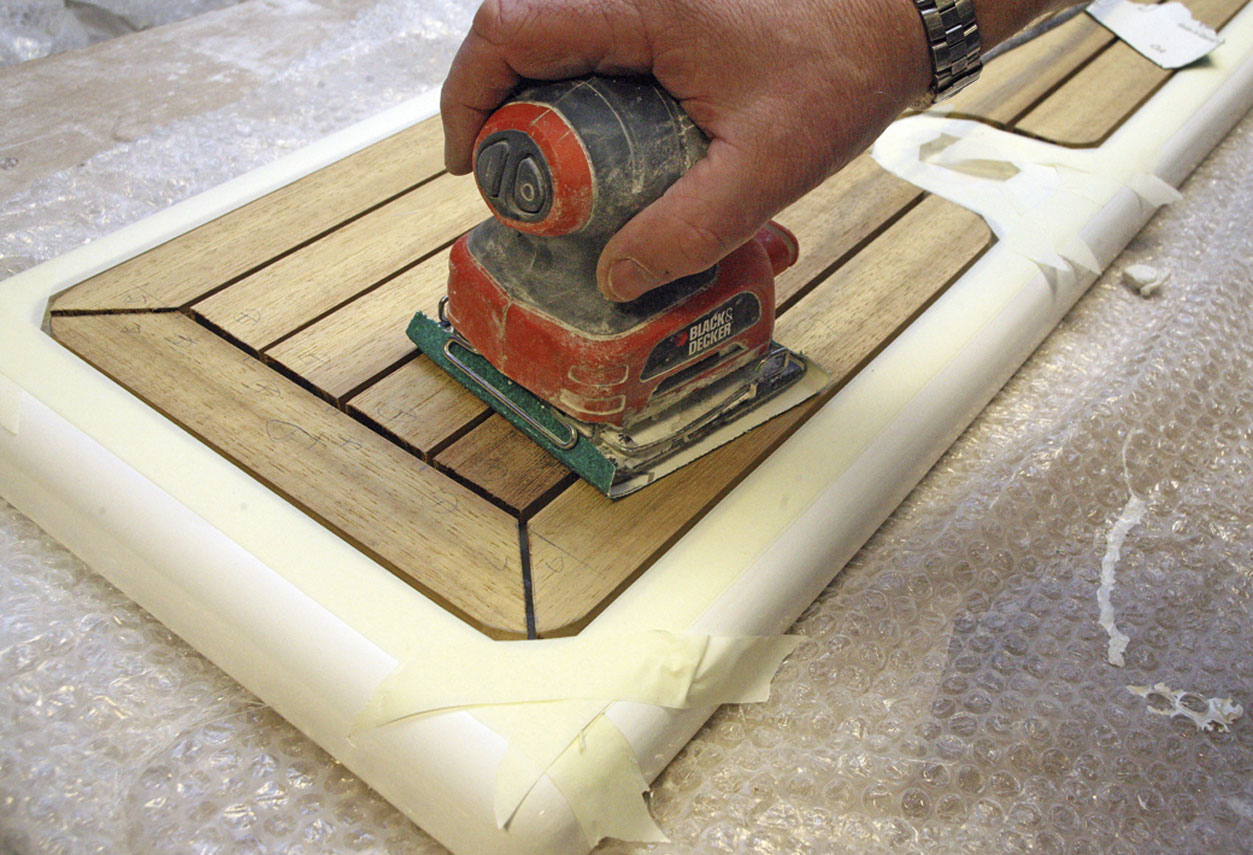
8: When dry, give the whole surface a preliminary sanding to ensure the surface is level and smooth. Mask off the gelcoat with several layers of masking tape to protect it from the sandpaper. When you’ve finished, use a vacuum cleaner to remove all the dust.

Before the caulking can be applied, the edges of the wood must be primed. There’s a special clear primer formulated for the job, but even a small can seems expensive compared with the cost of the overall project.

10: The bottom of the joints need to be taped off so the caulking compound doesn’t stick to the gelcoat and shear as the wood expands and contracts.

11: Carefully mask off the glassfibre, then apply a bead of caulking compound around the outer edge. As you’ll be unable to sand this outside joint when the compound is dry, use a wetted finger to smooth the joint where it meets the glassfibre.

12: Squirt caulking compound into the bottom of the joint, and then overfill the joint – it will settle a bit when dry. Trowel the surface of the joint to drive out any air bubbles. Remove masking tape before the joint dries and use white spirit to clean off any caulking that found its way under the masking tape.
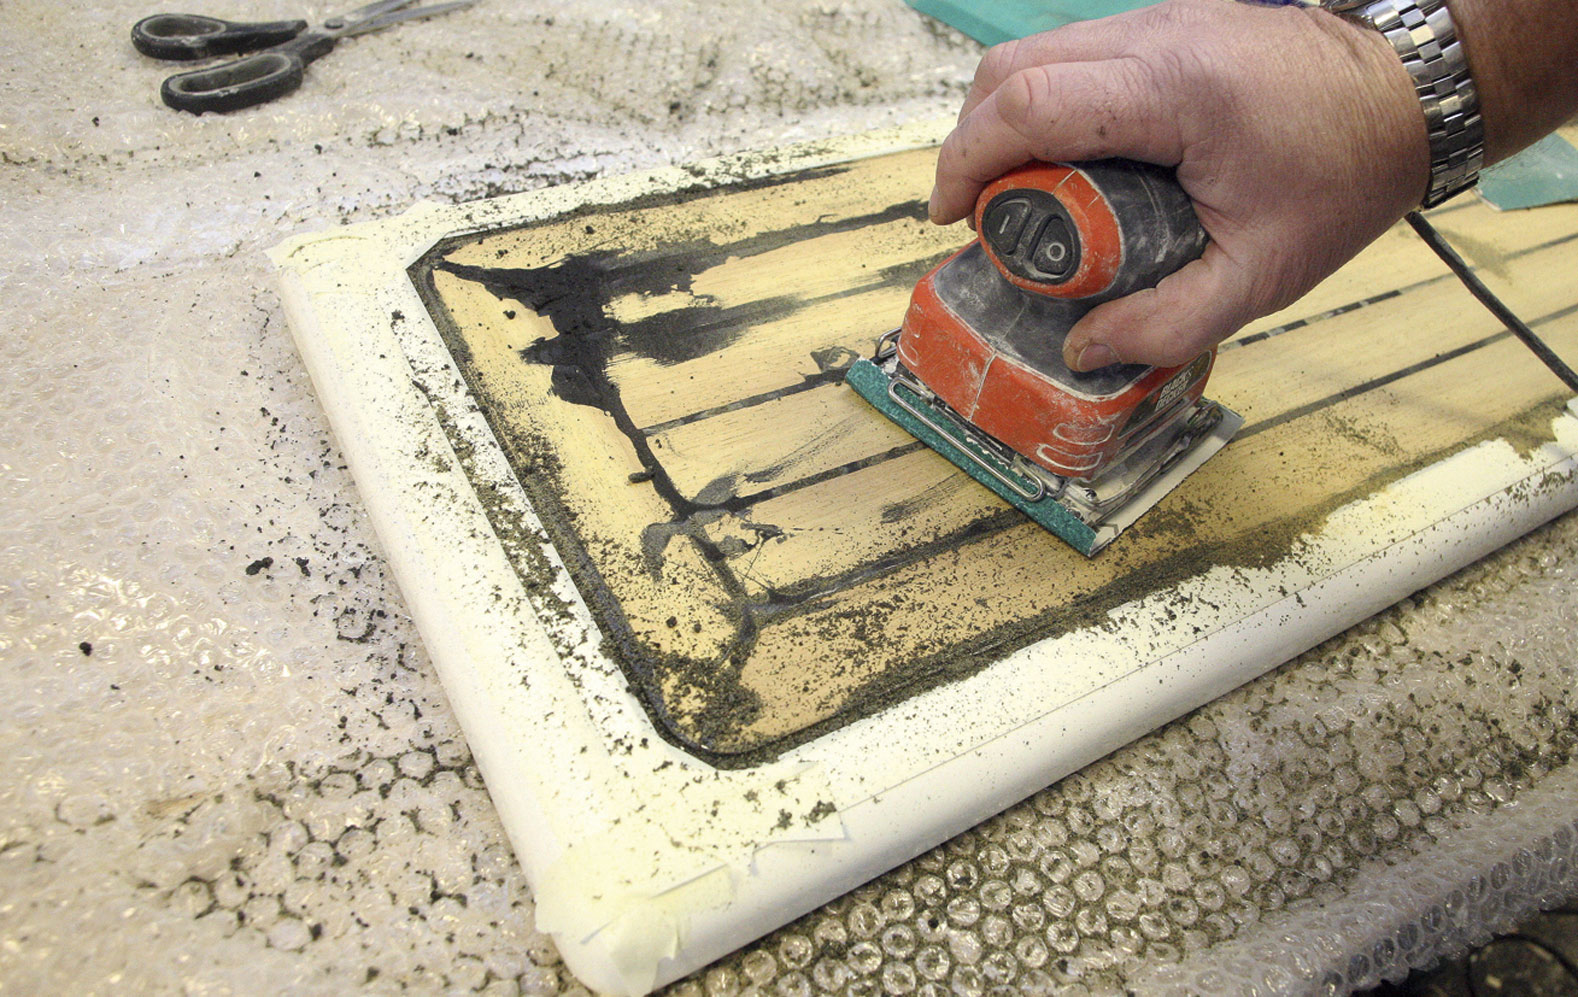
13: When the caulking is dry, carefully sand the surface, keeping well away from the gelcoat around the edges. I aimed to have the wooden infill standing proud of the glassfibre by about 2mm: this will hopefully discourage puddles of water from sitting on the surface.
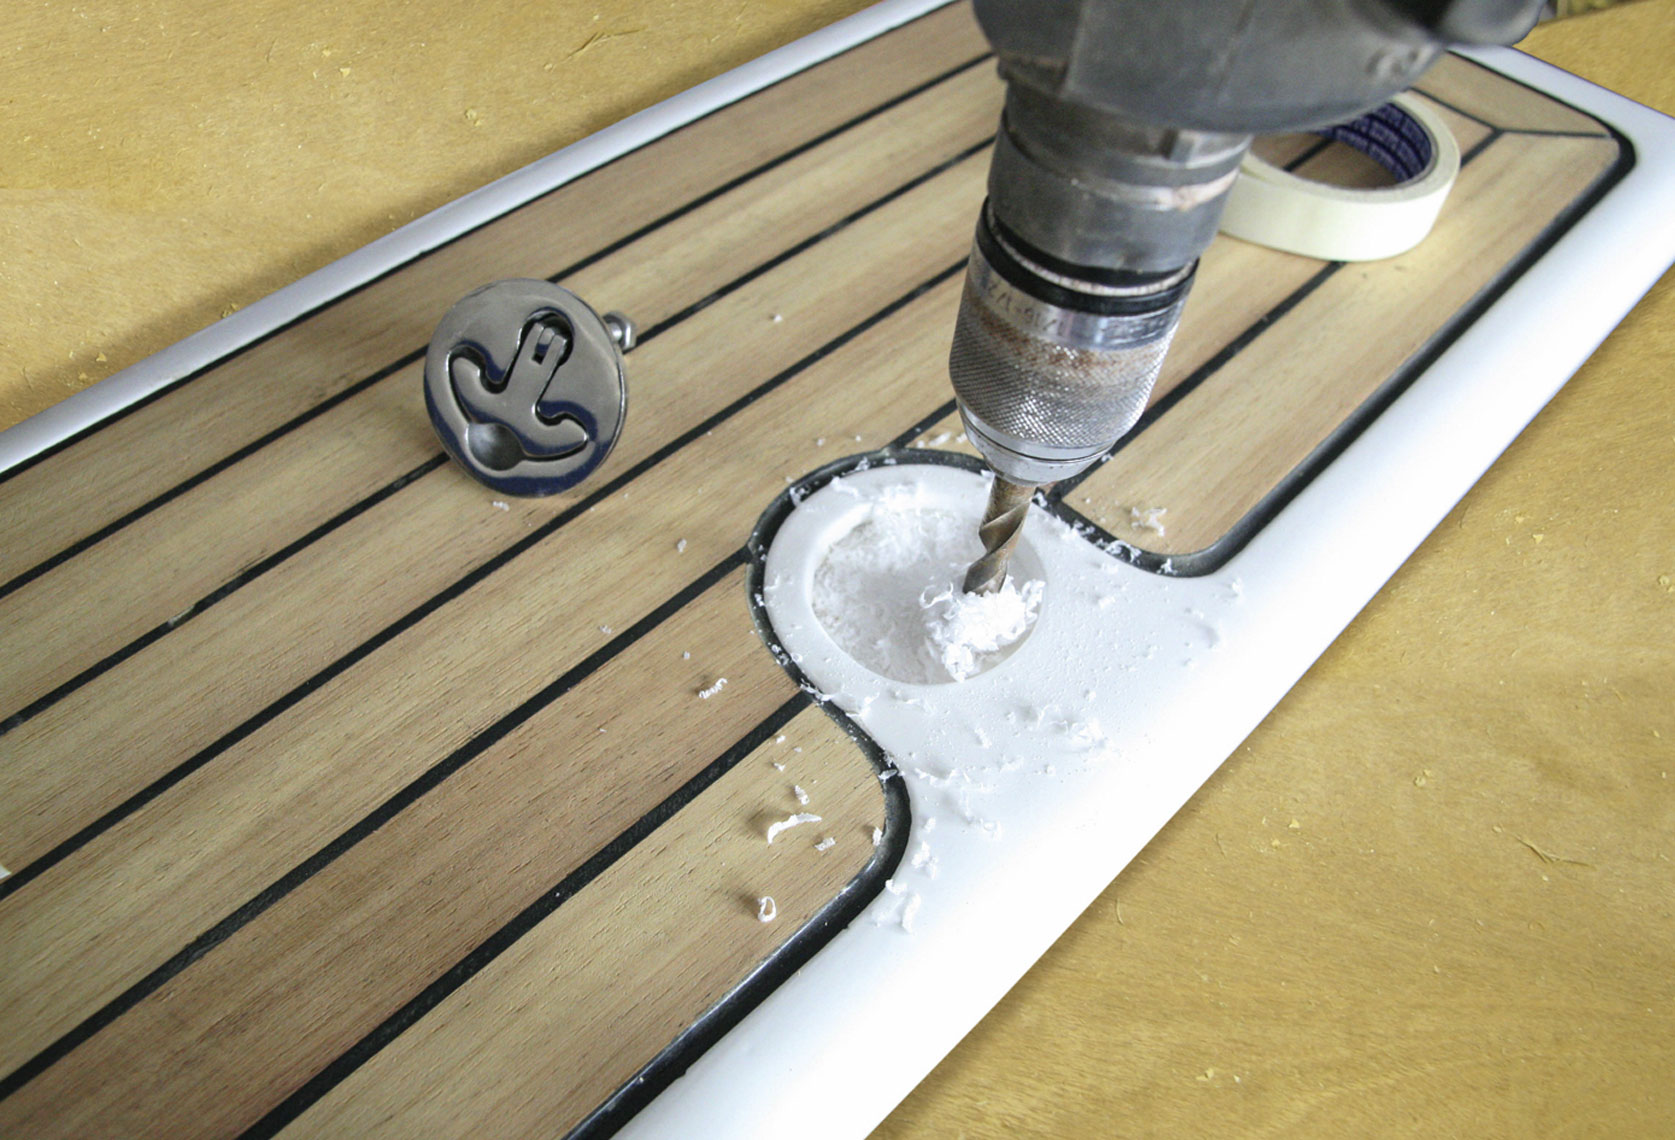
14: The final task was to fit the hinges and locks: I bought these from the Northern Boat Jumble for less than a quarter of the price of new fittings from a chandlery.
The Finished Article:

I am very pleased with the finished job. Yes, it did cost more than I would have preferred, and took four times as long as I expected, but what else would I be doing on those long winter evenings? The trick is to take your time with the finish of the mould, mix resin carefully, and prepare glassfibre materials in advance. Accurate cutting of the wood inlay will pay dividends and enhance the overall finish. Keep caulking away from anything that doesn’t need caulking:
including your hands.
What it cost
Glassfibre mat, resin, gelcoat, pigment, catalyst: £68
40mm x 10mm iroko planking: £22
Adhesive: £18
Caulking: £32
Fittings: £19
Total: £159
About the author:
 Tim Marsden started sailing at the age of seven in a Mirror dinghy constructed by his father. In later years he sailed extensively around Anglesey, Falmouth and the Channel Islands, crewing on a friend’s boat.